Falling For Oklch: A Love Story Of Color Spaces, Gamuts, And CSS
Geoff Graham
I woke up one morning in early 2022 and caught an article called “A Whistle-Stop Tour of 4 New CSS Color Features” over at CSS-Tricks.
Wow, what a gas! A new and wider color gamut! New color spaces! New color functions! New syntaxes! It is truly a lot to take in.
Now, I’m no color expert. But I enjoyed adding new gems to my CSS toolbox and made a note to come back to that article later for a deeper read. That, of course, led to a lot of fun rabbit holes that helped put the CSS Color Module Level 4 updates in a better context for me.
That’s where Oklch comes into the picture. It’s a new color space in CSS that, according to experts smarter than me, offers upwards of 50% more color than the sRGB gamut we have worked with for so long because it supports a wider gamut of color.
Color spaces? Gamuts? These are among many color-related terms I’m familiar with but have never really understood. It’s only now that my head is wrapping around these concepts and how they relate back to CSS, and how I use color in my own work.
That’s what I want to share with you. This article is less of a comprehensive “how-to” guide than it is my own personal journey grokking new CSS color features. I actually like to this of this more as a “love story” where I fall for Oklch.
The Deal With Gamuts And Color Spaces
I quickly learned that there’s no way to understand Oklch without at least a working understanding of the difference between gamuts and color spaces. My novice-like brain thinks of them as the same: a spectrum of colors. In fact, my mind goes straight to the color pickers we all know from apps like Figma and Sketch.
I’ve always assumed that gamut is just a nerdier term for the available colors in a color picker and that a color picker is simply a convenient interface for choosing colors in the gamut.
(Assumed. Just. Simply. Three words you never want to see in the same sentence.)
Apparently not. A gamut really boils down to a range of something, which in this case, is a range of colors. That range might be based on a single point if we think of it on a single axis.

Or it might be a range of multiple coordinates like we would see on a two-axe grid. Now the gamut covers a wider range that originates from the center and can point in any direction.

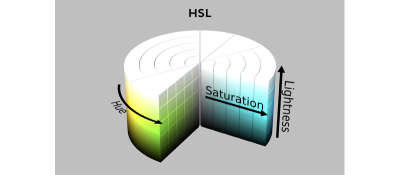
The levels of those ranges can also constitute an axis, which results in some form of 3D space.

sRGB is a gamut with an available range of colors. Display P3 is another gamut offering a wider range of colors.
So, gamuts are ranges, and ranges need a reference to determine the upper and lower limits of those axes. That’s where we start talking about color spaces. A color space is what defines the format for plotting points on the gamut. While more trained folks certainly have more technical explanations, my basic understanding of color spaces is that they provide the map — or perhaps the “shape” — for the gamut and define how color is manipulated in it. So, sRGB is a color gamut that spans a range of colors, and Hex, RGB, and HSL (among others, of course) are the spaces we have to explore the gamut.
That’s why you may hear a color space as having a “wider” or “narrower” gamut than another — it’s a range of possibilities within a shape.
If I’ve piqued your interest enough, I’ve compiled a list of articles that will give you more thorough definitions of gamuts and color spaces at the end of this article.
Why We Needed New Color Spaces
The short answer is that the sRGB gamut serves as the reference point for color spaces like Hex, RGB, and HSL that provide a narrower color gamut than what is available in the newer Display P3 gamut.
We’re well familiar with many of sRGB-based color notations and functions in CSS. The values are essentially setting points along the gamut space with different types of coordinates.
  /* Hex */ #f8a100
  /* RGB */ rgb(248, 161, 2)
  /* HSL */ hsl(38.79 98% 49%)
For example, the rgb() function is designed to traverse the RGB color space by mixing red, blue, and green values to produce a point along the sRGB gamut.
Hexadecimal (Hex) values may indeed be the most widely used color notation, but that’s likely to do with the fact that they’ve been around longer and have always enjoyed great cross-browser support. It certainly is tough to understand what each value is doing, at least for me. It’s not an immediately intuitive format that most people can see and know what color to expect.
There are named colors, for sure. But even explicit color names, most notably grey and darkgrey, still yield unexpected results.
See the Pen [Named Greys [forked]](https://codepen.io/smashingmag/pen/qBQMKxr) by Geoff Graham.
The RGB syntax is certainly a lot easier to understand than Hex. The values are defined right on the tin: Red, Green, and Blue, where each value is measured in degrees. But still, it’s tough to know exactly what color you’ll get when mixing these values together. I usually expect brown when I mix red, blue, and green together with my daughter’s watercolor paint set.
HSL has been my love for some time now. It’s so darn easy to understand:
- Hue: The angle along the wheel of colors with a range of
0degto360deg. - Saturation: The vividness, or perhaps richness, of the color, measured as a percentage with a range of
0%to100%. The lower the saturation, the “greyer” it gets. - Lightness: You know, the brightness of the color. It’s also measured as a percentage with a range of
0%to100%.
I like that. Pick a color, set its intensity, then decide how bright you need it. That’s way more intuitive than mixing colors or deciphering Hex codes.
So, why did we suddenly decide that we need new Oklch/LCH and Oklab/LAB spaces? It has largely to do with three factors: technology, grey zones, and consistency.
Technology Is Getting Fancier
Remember when the iPhone 4 came out and the term retina display entered our vernacular? That’s a great example of how screens have improved over time. In that instance, retina displays packed more pixels into the same amount of space than traditional monitors, allowing for remarkably crisp visuals. And we adapted to it in HTML by providing different image formats to different pixel densities and in CSS with media queries.
Now, monitors are beginning to support wider gamuts of color. Display P3 is one of them that Apple devices already support.

If the difference between the two ranges in the image above doesn’t strike you as particularly significant or noticeable, that’s fair. I thought they were the same at first. But the Display P3 stripe is indeed a wider and smoother range of colors than the sRGB stripe above it when you examine it up close.
The problem is that Hex, RGB, and HSL (among other existing spaces) only support the sRGB gamut. In other words, they are unable to map colors outside of the range of colors that sRGB offers. That means there’s no way to map them to colors in the Display P3 gamut. The traditional color formats we’ve used for a long time are simply incompatible with the range of colors that has started rolling out in new hardware. We needed a new space to accommodate the colors that new technology is offering us.
Dead Grey Zones
I love this term. It accurately describes an issue with the color spaces in the sRGB gamut — greyish areas between two color points. You can see it in the following demo.
See the Pen [HSL "Dead Grey Zone" [forked]](https://codepen.io/smashingmag/pen/vYQzrad) by Geoff Graham.
The greys are subtle, but they are there!
To get a smoother transition between colors that doesn’t intercept grey, the transition needs to go around the color wheel rather than through it. The problem is that none of the sRGB-based spaces really do that. For example, HSL is a cylindrical shape where all of the hues have a consistent range of saturation: 0% to 100%. That means some colors are muddied with grey because HSL has to deform them in order to maintain that consistent range.
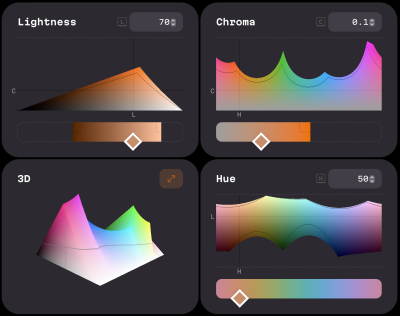
Oklch (as well as the other new spaces in the Level 4 spec) doesn’t have that issue. Hues are more like mountains, each with a different elevation.
That’s why we needed new color spaces — to get around those dead grey zones. And we needed new color functions in CSS to produce coordinates on the space to select from the newly available range of colors.
But there’s a catch. That mountain-shaped gamut of Oklch doesn’t always provide a straight path between color points which could result in clipped or unexpected colors between points. The issue appears to be case-specific depending on the colors in use, but that also seems to indicate that there are situations where using a different color space is going to yield better gradients.
Consistent Lightness
It’s the consistent range of saturation in HSL muddying the waters that leads to another issue along this same train of thought: inconsistent levels of lightness between colors.
The classic example is showing two colors in HSL with the same lightness value:
See the Pen [HSL Lightness [forked]](https://codepen.io/smashingmag/pen/abQaKQp) by Geoff Graham.
That’s no big deal for Oklch and the other new color spaces. Lightness is measured authentically by varying levels of saturation. (Well, technically, varying levels of chroma, which is the “c” in Oklch.)
See the Pen [OKLCH Lightness [forked]](https://codepen.io/smashingmag/pen/NWELzEm) by Geoff Graham.
Oklch? Oklab? LCH? LAB?
I’ve referenced all of these up to this point. I might as well clear those up as best I can because there’s a difference between Oklch and Oklab, not to mention LCH and LAB.
First off, they are all color spaces designed to map colors along the Display P3 gamut. We’ve established that up to this point.
Let’s start with the difference between the LAB and LCH spaces. If I understand correctly — and I might not — LCH and LAB were designed to avoid the dead grey zones in the sRGB space, and they do so by supporting the Display P3 gamut. But, as Andrey Sitnik and Travis Turner explain over at the Evil Martians blog, LCH and LAB have a negative side effect: the hue shifts ever-so-slightly when the chroma and lightness values change.

The Oklab and Oklch color spaces were created to fix that shift. Black is more, well, black because the hues are more consistent in Oklab and Oklch than they are in LAB and LCH.
So, that’s why it’s likely better to use the oklch() and oklab() functions in CSS than it is to use their lch() and lab() counterparts. There’s less of a shift happening in the hues.
So, while Oklch/LCH and Oklab/LAB all use the same general color space, the Cartesian coordinates are the key difference. And I agree with Sitnik and Turner, who make the case that Oklch and LCH are easier to understand than LAB and Oklab. I wouldn’t be able to tell you the difference between LAB’s a and b values on the Cartesian coordinate system. But chroma and hue in LCH and Oklch? Sure! That’s as easy to understand as HSL but better!
The reason I love Oklch over Oklab is that lightness, chroma, and hue are much more intuitive to me than lightness and a pair of Cartesian coordinates.
And the reason I like Oklch better than HSL is because it produces more consistent results over a wider color gamut.
OKLCH And CSS
This is why you’re here, right? What’s so cool about all this is that we can start using Oklch in CSS today — there’s no need to wait around.
“Browser support?” you ask. We’re well covered, friends!
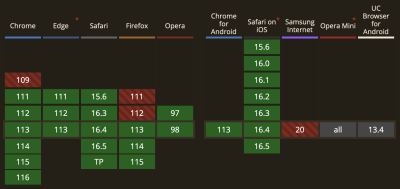
In fact, Firefox 113 shipped support for Oklch a mere ten days before I started writing the first draft of this article. It’s oven fresh!
Using oklch() is a whole lot easier to explain now that we have all the context around color spaces and gamuts and how the new CSS Color Module Level 4 color functions fit into the picture.
I think the most difficult thing for me is working with different ranges of values. For example, hsl() is easy for me to remember because the hue is measured in degrees, and both saturation and lightness use the same 0% to 100% range.
oklch() is different, and that’s by design to not only access the wider gamut but also produce perceptively consistent results even as values change. So, while we get what I’m convinced is a way better tool for specifying color in CSS, there is a bit of a learning curve to remembering the chroma value because it’s what separates OKLCH from HSL.
The oklch() Values
Here they are:
l: This controls the lightness of the color, and it’s measured in a range of0%to100%just like HSL.c: This is the chroma value, measured in decimals between0and0.37.h: This is the same ol’ hue we have in HSL, measured in the same range of0degto360deg.
Again, it’s chroma that is the biggest learning curve for me. Yes, I had to look it up because I kept seeing it used somewhat synonymously with saturation.
Chroma and saturation are indeed different. And there are way better definitions of them out there than what I can provide. For example, I like how Cameron Chapman explains it:
“Chroma refers to the purity of a color. A hue with high chroma has no black, white, or gray added to it. Conversely, adding white, black, or gray reduces its chroma. It’s similar to saturation but not quite the same. Chroma can be thought of as the brightness of a color in comparison to white.”
— Cameron Chapman
I mentioned that chroma has an upper limit of 0.37. But it’s actually more nuanced than that, as Sitnik and Turner explain:
“[Chroma] goes from
0(gray) to infinity. In practice, there is actually a limit, but it depends on a screen’s color gamut (P3 colors will have bigger values than sRGB), and each hue has a different maximum chroma. For both P3 and sRGB, the value will always be below0.37.”— Andrey Sitnik and Travis Turner
I’m so glad there are smart people out there to help sort this stuff out.
The oklch() Syntax
The formal syntax? Here it is, straight from the spec:
oklab() = oklab( [ <percentage> | <number> | none]
    [ <percentage> | <number> | none]
    [ <percentage> | <number> | none]
    [ / [<alpha-value> | none] ]? )
Maybe we can “dumb” it down a bit:
oklch( [ lightness ] [ chroma ] [ hue ] )
And those values, again, are measured in different units:
oklch( [ lightness = <percentage> ] [ chroma <number> ] [ hue <degrees> ] )
Those units have min and max limits:
oklch( [ lightness = <percentage (0%-100%)> ] [ chroma <number> (0-0.37) ] [ hue <degrees> (0deg-360deg) ] )
An example might be the following:
color: oklch(70.9% 0.195 47.025);
Did you notice that there are no commas between values? Or that there is no unit on the hue? That’s thanks to the updated syntax defined in the CSS Color Module Level 4 spec. It also applies to functions in the sRGB gamut:
/* Old Syntax */
hsl(26.06deg, 99%, 51%)

/* New Syntax */
hsl(26.06 99% 51%)
Something else that’s new? There’s no need for a separate function to set alpha transparency! Instead, we can indicate that with a / before the alpha value:
/* Old Syntax */
hsla(26.06deg, 99%, 51%, .75)

/* New Syntax */
hsl(26.06 99% 51% / .75)
That’s why there is no oklcha() function — the new syntax allows oklch() to handle transparency on its own, like a grown-up.
Providing A Fallback
Yeah, it’s probably worth providing a fallback value for oklch() even if it does enjoy great browser support. Maybe you have to support a legacy browser like IE, or perhaps the user’s monitor or screen simply doesn’t support colors in the Display P3 gamut.
Providing a fallback doesn’t have to be hard:
color: hsl(26.06 99% 51%);
color: oklch(70.9% 0.195 47.025);
There are “smarter” ways to provide a fallback, like, say, using @supports:
.some-class {
  color: hsl(26.06 99% 51%);
}

@supports (oklch(100% 0 0)) {
  .some-class {
    color: oklch(70.9% 0.195 47.025);
  }
}
Or detecting Display P3 support on the @media side of things:
.some-class {
  color: hsl(26.06 99% 51%);
}

@media (color-gamut: p3) {
  .some-class {
    color: oklch(70.9% 0.195 47.025);
  }
}
Those all seem overly verbose compared to letting the cascade do the work. Maybe there’s a good reason for using media queries that I’m overlooking.
There’s A Polyfill
Of course, there’s one! There are two, in fact, that I am aware of: postcss-oklab-function and color.js. The PostCSS plugin will preprocess support for you when compiling to CSS. Alternatively, color.js will convert it on the client side.
That’s Oklch 🥰
O, Oklch! How much do I love thee? Let me count the ways:
- You support a wider gamut of colors that make my designs pop.
- Your space transitions between colors smoothly, like soft butter.
- You are as easy to understand as my former love, HSL.
- You are well-supported by all the major browsers.
- You provide fallbacks for handling legacy browsers that will never have the pleasure of knowing you.
I know, I know. Get a room, right?!
Resources
- CSS Color Module Level 4, W3C
- W3C Workshop on Wide Color Gamut and High Dynamic Range for the Web, Chris Lilley (W3C)
- “OKLCH in CSS: why we moved from RGB and HSL,” Andrey Sitnik and
Travis Turner - “Color Formats in CSS,” Joshua Comeau
- “High Definition CSS Color Guide,” Adam Argyle
- “LCH colors in CSS: what, why, and how?,” Lea Verou
- “OK, OKLCH 👑,” Chris Coyier
- “It’s Time to Learn oklch Color,” Keith J. Grant
- “Color Theory For Designers, Part 2: Understanding Concepts And Color Terminology,” Cameron Chapman (Smashing Magazine)
- HSL and HSV, Wikipedia
(yk)