A Few Ways CSS Is Easier To Write In 2023

A Few Ways CSS Is Easier To Write In 2023

A Few Ways CSS Is Easier To Write In 2023

Geoff Graham

2023-11-24T08:00:00+00:00
2023-11-28T22:05:37+00:00

A little while back, I poked at a number of “modern” CSS features and openly evaluated whether or not they have really influenced the way I write styles.

Spoiler alert: The answer is not much. Some, but not to the extent that the styles I write today would look foreign when held side-by-side with a stylesheet from two or three years ago.

That was a fun thought process but more academic than practicum. As I continue thinking about how I approach CSS today, I’m realizing that the differences are a lot more subtle than I may have expected — or have even noticed.

CSS has gotten easier to write than it is different to write.

And that’s not because of one hot screaming new feature that changes everything — say, Cascade Layers or new color spaces — but how many of the new features work together to make my styles more succinct, resilient, and even slightly defensive.

Let me explain.

Efficient Style Groups

Here’s a quick hit. Rather than chaining :hover and :focus states together with comma separation, using the newer :is() pseudo-class makes it a more readable one-liner:

/* Tradition */
a:hover,
a:focus {
  /* Styles */
}

/* More readable */
a:is(:hover, :focus) {
  /* Styles */
}

I say “more readable” because it’s not exactly more efficient. I simply like how it reads as normal conversation: An anchor that is in hover or in focus is styled like this…

Of course, :is() can most definitely make for a more efficient selector. Rather than make up some crazy example, you can check out MDN’s example to see the efficiency powers of :is() and rejoice.

Centering

This is a classic example, right? The “traditional” approach for aligning an element in the center of its parent container was usually a no-brainer, so to speak. We reached for some variety of margin: auto to push an element from all sides inward until it sits plumb in the middle.

That’s still an extremely effective solution for centering, as the margin shorthand looks at every direction. But say we only need to work in the inline direction, as in left and right, when working in a default horizontal left-to-write writing mode. That’s where the “traditional” approach falls apart a bit.

/* Traditional */
margin-left: auto;
margin-right: auto;

Maybe “falls apart” is heavy-handed. It’s more that it requires dropping the versatile margin shorthand and reaching specifically for two of its constituent properties, adding up to one more line of overhead. But, thanks to the concept of logical properties, we get two more shorthands of the margin variety: one for the block direction and one for the inline direction. So, going back to a situation where centering only needs to happen in the inline direction, we now have this to keep things efficient:

/* Easier! */
margin-inline: auto;

And you know what else? The simple fact that this example makes the subtle transition from physical properties to logical ones means that this little snippet is both as equally efficient as throwing margin: auto out there and resilient to changes in the writing mode. If the page suddenly finds itself in a vertical right-to-left mode, it still holds up by automatically centering the element in the inline direction when the inline direction flows up and down rather than left and right.

Adjusting For Writing Modes, In General

I’ve already extolled the virtues of logical properties. They actually may influence how I write CSS today more than any other CSS feature since Flexbox and CSS Grid.

I certainly believe logical properties don’t get the credit they deserve, likely because document flow is a lot less exciting than, say, things like custom properties and container queries.

Traditionally, we might write one set of styles for whatever is the “normal” writing direction, then target the writing mode on the HTML level using [dir="rtl"] or whatever. Today, though, forget all that and use logical properties instead. That way, the layout follows the writing mode!

So, where we may normally need to reset a physical margin when changing writing modes like this:

/* Traditional */
body {
  margin-left: 1rem;
}

body[dir="rtl"] {
  margin-left: 0; /* reset left margin */
  margin-right: 1rem; /* apply to the right */
  text-align: right; /* push text to the other side */
}

… there’s no longer a need to rest things as long as we’re working with logical properties:

/* Much easier! */
body {
  margin-inline-start: 1rem;
}

Trimming Superfluous Spacing

Here’s another common pattern. I’m sure you’ve used an unordered list of links inside of a <nav> for the main or global navigation of a project.

<nav>
  <ul>
    <li><a href="/products">Products</a></li>
    <li><a href="/products">Services</a></li>
    <li><a href="/products">Docs</a></li>
    <!-- etc. -->
  <ul>
</nav>

And in those cases, I’m sure you’ve been asked to display those links side-by-side rather than allowing them to stack vertically as an unordered list is naturally wont to do. Some of us who have been writing styles for some years may have muscle memory for changing the display of those list items from default block-level elements into inline elements while preserving the box model properties of block elements:

/* Traditional */
li {
  display: inline-block;
}

You’re going to need space between those list items. After all, they no longer take up the full available width of their parent since inline-block elements are only as wide as the content they contain, plus whatever borders, padding, margin, and offsets we add. Traditionally, that meant reaching for margin as we do for centering, but only the constituent margin property that applies the margin in the inline direction we want, whether that is margin-left/margin-inline-start or margin-right/margin-inline-end.

Let’s assume we’re working with logical properties and want a margin at the end of the list of items in the inline direction:

/* Traditional */
li {
  display: inline-block;
  margin-inline-end: 1rem;
}

But wait! Now we have margin on all of the list items. There’s really no need for a margin on the last list item because, well, there are no other items after it.

Three styled links from left-to-right with extra margin highlighted on the last item.

(Large preview)

That may be cool in the vast majority of situations, but it leaves the layout susceptible. What if, later, we decide to display another element next to the <nav>? Suddenly, we’re dealing with superfluous spacing that might affect how we decide to style that new element. It’s a form of technical debt.

It would be better to clean that up and tackle spacing for reals without that worry. We could reach for a more modern feature like the :not() pseudo-class. That way, we can exclude the last list item from participating in the margin party.

/* A little more modern */
li {
  display: inline-block;
}
li:not(:last-of-type) {
  margin-inline-end: 1rem;
}

Even easier? Even more modern? We could reach for the margin-trim property, which, when applied to the parent element, chops off superfluous spacing like a good haircut, effectively collapsing margins that prevent the child elements from sitting flush with the parent’s edges.

/* Easier, more modern */
ul {
  margin-trim: inline-end;
}

li {
  display: inline-block;
  margin-inline-end: 1rem;
}

Before any pitchforks are raised, let’s note that margin-trim is experimental and only supported by Safari at the time I’m writing this. So, yes, this is bleeding-edge modern stuff and not exactly the sort of thing you want to ship straight to production. Just because something is “modern” doesn’t mean it’s the right tool for the job!

In fact, there’s probably an even better solution without all the caveats, and it’s been sitting right under our noses: Flexbox. Turning the unordered list into a flexible container overrides the default block-level flow of the list items without changing their display, giving us the side-by-side layout we want. Plus, we gain access to the gap property, which you might think of as margin with margin-trim built right in because it only applies space between the children rather than all sides of them.

/* Less modern, but even easier! */
ul {
  display: flex;
  gap: 1rem;
}

This is what I love about CSS. It’s poetic in the sense that there are many ways to say the same thing — some are more elegant than others — but the “best” approach is the one that fits your thinking model. Don’t let anyone tell you you’re wrong if the output is what you’re expecting.

Just because we’re on the topic of styling lists that don’t look like lists, it’s worth noting that the common task of removing list styles on both ordered and unordered lists (list-style-type: none) has a side effect in Safari that strips the list items of its default accessible role. One way to “fix” it (if you consider it a breaking change) is to add the role back in HTML a là <ul role="list>. Manuel Matuzović has another approach that allows us to stay in CSS by removing the list style type with a value of empty quotes:

ul {
  list-style-type: "";
}

I appreciate that Manuel not only shared the idea but has provided the results of light testing as well while noting that more testing might be needed to ensure it doesn’t introduce other latent consequences.

Maintaining Proportions

There’s no need to dwell on this one. We used to have very few options for maintaining an element’s physical proportions. For example, if you want a perfect square, you could rely on fixed pixel units explicitly declared on the element’s width and height:

/* Traditional */
height: 500px;
width: 500px;

Or, perhaps you need the element’s size to flex a bit, so you prefer relative units. In that case, something like percentages is difficult because a value like 50% is relative to the size of the element’s parent container rather than the element itself. The parent element then needs fixed dimensions or something else that’s completely predictable. It’s almost an infinite loop of trying to maintain the 1:1 proportion of one element by setting the proportion of another containing element.

The so-called “Padding Hack” sure was a clever workaround and not really much of a “hack” as much as a display of masterclass-level command of the CSS Box Model. Its origins date back to 2009, but Chris Coyier explained it nicely in 2017:

“If we force the height of the element to zero (`height: 0;`) and don’t have any borders, then the padding will be the only part of the box model affecting the height, and we’ll have our square.”

— Chris Coyier

Anyway, it took a lot of ingenious CSS to pull it off. Let’s hear it for the CSS Working Group, which came up with a much more elegant solution: an aspect-ratio property.

/* Easier! */
aspect-ratio: 1;
width: 50%;

Now, we have a perfect square no matter how the element’s width responds to its surroundings, providing us with an easier and more efficient ruleset that’s more resilient to change. I often find myself using aspect-ratio in place of an explicit height or width in my styles these days.

Card Hover Effects

Not really CSS-specific, but styling a hover effect on a card has traditionally been a convoluted process where we wrap the element in an <a> and hook into it to style the card accordingly on hover. But with :has() — now supported in all major browsers as of Firefox 121! — we can put the link in the card as a child how it should be and style the card as a parent element when it *has* hover.

.card:has(:hover, :focus) {
  /* Style away! */
}

That’s way super cool, awesome, and easier to read than, say:

a.card-link:hover > .card {
  /* Style what?! */
}

Creating And Maintaining Color Palettes

A long, long time ago, I shared how I name color variables in my Sass files. The point is that I defined variables with hexadecimal values, sort of like this in a more modern context using CSS variables instead of Sass:

/* Traditional */
:root {
  --black: #000;
  --gray-dark: #333;
  --gray-medium: #777;
  --gray-light: #ccc;
  --gray-lighter: #eaeaea;
  --white: #fff;
}

There’s nothing inherently wrong with this. Define colors how you want! But notice that what I was doing up there was manually setting a range of grayscale colors and doing so with inflexible color values. As you might have guessed by this point, there is a more efficient way to set this up so that it is much more maintainable and even easier to read.

/* Easier to maintain! */
:root {
  --primary-color: #000;
  --gray-dark: color-mix(in srgb, var(--primary-color), #fff 25%);
  --gray-medium: color-mix(in srgb, var(--primary-color), #fff 40%);
  --gray-light: color-mix(in srgb, var(--primary-color), #fff 60%);
  --gray-lighter: color-mix(in srgb, var(--primary-color), #fff 75%);
}

Those aren’t exactly 1:1 conversions. I’m too lazy to do it for real, but you get the idea, right? Right?! The “easier” way may *look* more complicated, but if you want to change the main color, update the --primary-color variable and call it a day.

Perhaps a better approach would be to change the name --primary-color to --grayscale-palette-base. This way, we can use the same sort of approach across many other color scales for a robust color system.

/* Easier to maintain! */
:root {
  /* Baseline Palette */
  --black: hsl(0 0% 0%);
  --white: hsl(0 0% 100%);
  --red: hsl(11 100% 55%);
  --orange: hsl(27 100% 49%);
  /* etc. */

  /* Grayscale Palette */
  --grayscale-base: var(--black);
  --grayscale-mix: var(--white);

  --gray-100: color-mix(in srgb, var(--grayscale-base), var(--grayscale-mix) 75%);
  --gray-200: color-mix(in srgb, var(--grayscale-base), var(--grayscale-mix) 60%);
  --gray-300: color-mix(in srgb, var(--grayscale-base), var(--grayscale-mix) 40%);
  --gray-400: color-mix(in srgb, var(--grayscale-base), var(--grayscale-mix) 25%);

  /* Red Palette */
  --red-base: var(--red);
  --red-mix: var(--white);

  --red-100: color-mix(in srgb, var(--red-base), var(--red-mix) 75%);
  /* etc. */

  /* Repeat as needed */
}

Managing color systems is a science unto itself, so please don’t take any of this as a prescription for how it’s done. The point is that we have easier ways to approach them these days, whereas we were forced to reach for non-CSS tooling to even get access to variables.

Managing Line Lengths

Two things that are pretty new to CSS that I’m absolutely loving:

  • Character length units (ch);
  • text-wrap: balance.

As far as the former goes, I love it for establishing the maximum width of containers, particularly those meant to hold long-form content. Conventional wisdom tells us that an ideal length for a line of text is somewhere between 50-75 characters per line, depending on your source. In a world where font sizing can adapt to the container size or the viewport size, predicting how many characters will wind up on a line is a guessing game with a moving target. But if we set the container to a maximum width that never exceeds 75 characters via the ch unit and a minimum width that fills most, if not all, of the containing width in smaller contexts, that’s no longer an issue, and we can ensure a comfortable reading space at any breakpoint — without media, to boot.

article {
  width: min(100%, 75ch);
}

Same sort of thing with headings. We don’t always have the information we need — font size, container size, writing mode, and so on — to produce a well-balanced heading. But you know who does? The browser! Using the new text-wrap: balance value lets the browser decide when to wrap text in a way that prevents orphaned words or grossly unbalanced line lengths in a multi-line heading. This is another one of those cases where we’re waiting on complete browser support (Safari, in this instance). Still, it’s also one of those things I’m comfortable dropping into production now as a progressive enhancement since there’s no negative consequence with or without it.

A word of caution, however, for those of you who may be tempted to apply this in a heavy-handed way across the board for all text:

/* 👎 */
* {
  text-wrap: balance;
}

Not only is that an un-performant decision, but the balance value is specced in a way that ignores any text that is longer than ten lines. The exact algorithm, according to the spec, is up to the user agent and could be treated as the auto value if the maximum number of lines is exceeded.

/* 👍 */
article:is(h1, h2, h3, h4, h5, h6) {
  text-wrap: balance;
}

text-wrap: pretty is another one in experimentation at the moment. It sounds like it’s similar to balance but in a way that allows the browser to sacrifice some performance gains for layout considerations. However, I have not played with it, and support for it is even more limited than balance.

How About You?

These are merely the things that CSS offers here in late 2023 that I feel are having the most influence on how I write styles today versus how I may have approached similar situations back in the day when, during writing, I had to walk uphill both ways to produce a stylesheet.

I can think of other features that I’ve used but haven’t fully adopted in my toolset. Those would include things like the following:

What say you? I know there was a period of time when some of us were openly questioning whether there’s “too much” CSS these days and opining that the learning curve for getting into CSS is becoming a difficult barrier to entry for new front-enders. What new features are you finding yourself using, and are they helping you write CSS in new and different ways that make your code easier to read and maintain or perhaps “re-learning” how you think about styles?

Smashing Editorial
(yk, il)

CSS Responsive Multi-Line Ribbon Shapes (Part 2)

CSS Responsive Multi-Line Ribbon Shapes (Part 2)

CSS Responsive Multi-Line Ribbon Shapes (Part 2)

Temani Afif

2023-11-22T10:00:00+00:00
2023-11-28T22:05:37+00:00

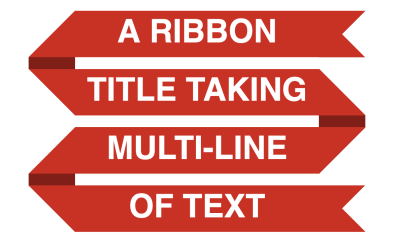
In my previous article, we tackled ribbons in CSS. The idea was to create a classic ribbon pattern using a single element and values that allow it to adapt to however much content it contains. We established a shape with repeating CSS gradients and tailor-cut the ribbon’s ends with clip-path() to complete the pattern, then used it and wound up with two ribbon variations: one that stacks vertically with straight strands of ribbons and another that tweaks the shape by introducing pseudo-elements.

See the Pen [Responsive multi-line ribbon shapes](https://codepen.io/t_afif/pen/LYMjNoo) by Temani Afif.

See the Pen Responsive multi-line ribbon shapes by Temani Afif.

Ready to step things up a bit? This time, we will create ribbons out of more complex shapes based on ones found in my collection of single-element CSS ribbons. We’re making adjustments to the basic shape we made before. Instead of perfectly straight strands of ribbon, we’re making angled cuts out of the shape.

See the Pen [Responsive multi-line ribbon shapes](https://codepen.io/t_afif/pen/NWeYwBK) by Temani Afif.

See the Pen Responsive multi-line ribbon shapes by Temani Afif.

The Basic Setup

Once again, all we are working with is a single element in the HTML:

<h1>Your content here</h1>

We are also going to rely on gradients to create the repetition, but the newcomer, this time, will be a CSS mask. Using masks is the key to creating such complex designs.

Let’s not forget the use of the lh unit. It gives us the height of one line, which is an important metric. We can already start by defining our first gradient, which is similar to the one we used in the previous article:

h1 {
  --c: #d81a14;
  background: linear-gradient(var(--c) 80%, #0000 0) 0 .1lh / 100% 1lh;
}

You’ll notice immediately that this gradient is different from the one we established in the last article. That’s because we’re covering 80% (instead of 70%) of the space before making a hard color stop to full transparency for the remaining 20% of space. That’s why we’re offsetting the gradient by .1lh on the background.

Two lines of white text against a red background.

(Large preview)

If you are wondering why I am using 80%, then there is no particular logic to my approach. It’s because I found that covering more space with the color and leaving less space between lines produces a better result for my eye. I could have assigned variables to control the space without touching the core code, but there’s already more than enough complexity going on. So, that’s the reasoning behind the hard-coded value.

Styling The First Ribbon

We’ll start with the red ribbon from the demo. This is what we’re attempting to create:

Four lines of white text against a red background ribbon with angled cuts at the ends.

(Large preview)

It may look complex, but we will break it down into a combination of basic shapes.

Stacking Gradients

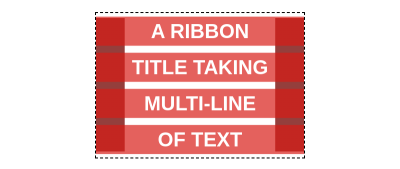
Let’s start with the gradient configuration, and below is the result we are aiming for. I am adding a bit of transparency to better see both gradients.

Highlighting the two gradients used in the pattern

(Large preview)
h1 {
  --c: #d81a14;

  padding-inline: .8lh;
  background:
    /* Gradient 1 */
    linear-gradient(var(--c) 80%, #0000 0) 
      0 .1lh / 100% 1lh,
    /* Gradient 2 */
    linear-gradient(90deg, color-mix(in srgb, var(--c), #000 35%) 1.6lh, #0000 0) 
      -.8lh 50% / 100% calc(100% - .3lh) repeat-x;
}

We already know all about the first gradient because we set it up in the last section. The second gradient, however, is placed behind the first one to simulate the folded part. It uses the same color variable as the first gradient, but it’s blended with black (#000) in the color-mix() function to darken it a smidge and create depth in the folds.

The thing with the second gradient is that we do not want it to reach the top and bottom of the element, which is why its height is equal to calc(100% - .3lh).

Note the use of padding in the inline direction, which is required to avoid text running into the ribbon’s folds.

Masking The Folded Parts

Now, it’s time to introduce a CSS mask. If you look closely at the design of the ribbon, you will notice that we are cutting triangular shapes from the sides.

Highlighting the masked areas of the pattern.

(Large preview)

We have applied a triangular shape on the left and right sides of the ribbon. Unlike the backgrounds, they repeat every two lines, giving us the complex repetition we want.

Imagine for a moment that those parts are transparent.

A dashed black border is drawn around six lines of white text against a background ribbon pattern.

(Large preview)

That will give us the final shape! We can do it with masks, but this time, let’s try using conic-gradient(), which is nice because it allows us to create triangular shapes. And since there’s one shape on each side, we’ll use two conical gradients — one for the left and one for the right — and repeat them in the vertical direction.


mask:
  conic-gradient(from 225deg at .9lh, #0000 25%, #000 0) 
    0 1lh / 50% 2lh repeat-y,
  conic-gradient(from 45deg at calc(100% - .9lh), #0000 25%, #000 0) 
    100% 0 / 50% 2lh repeat-y;

Each gradient covers half the width (50%) and takes up two lines of text (2lh). Also, note the 1lh offset of the first gradient, which is what allows us to alternate between the two as the ribbon adapts in size. It’s pretty much a zig-zag pattern and, guess what, I have an article that covers how to create zig-zag shapes with CSS masks. I highly recommend reading that for more context and practice applying masks with conical gradients.

Masking The Ribbon’s Ends

We are almost done! All we are missing are the ribbon’s cut edges. This is what we have so far:

See the Pen [First ribbon shape](https://codepen.io/t_afif/pen/XWOrNaa) by Temani Afif.

See the Pen First ribbon shape by Temani Afif.

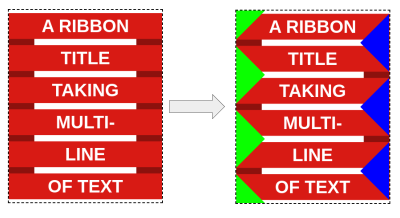
Notice that the cutout parts of the ribbon are hidden by the mask. We need to add more gradients to the mask to see them. Let’s start with the one at the top of the ribbon, as illustrated below.

Outlining the area of the ribbon’s end that needs to be filled with color.

(Large preview)

We can fill that in by adding a third gradient to the mask:

mask:
  /* New gradient */
  linear-gradient(45deg, #000 50%, #0000 0) 100% .1lh / .8lh .8lh no-repeat,

  conic-gradient(from 225deg at .9lh, #0000 25%, #000 0) 
   0 1lh / 50% 2lh repeat-y,
  conic-gradient(from 45deg  at calc(100% - .9lh), #0000 25%, #000 0) 
   100% 0 / 50% 2lh repeat-y;

That linear gradient will give us the missing part at the top, but we still need to do the same at the bottom, and here, it’s a bit tricky because, unlike the top part, the bottom is not static. The cutout can be either on the left or the right based on the number of lines of text we’re working with:

Highlighting the missing areas that need to be filled with color to create cuts at the ends of the ribbon.

The top part of the ribbon will always be first and maintain the same direction. But the bottom part could either be facing left or right, depending on whether there is an even or odd number of lines of text. (Large preview)

We will fill in those missing parts with two more gradients. Below is a demo where I use different colors for the newly added gradients to see exactly what’s happening. Use the resize handle to see how the ribbon adjusts when the number of lines changes.

See the Pen [Illustrating the full mask configuration](https://codepen.io/t_afif/pen/RwvboJO) by Temani Afif.

See the Pen Illustrating the full mask configuration by Temani Afif.

See that? The bottom part of the ribbon is positioned in such a way that it is obscured by the fold on the left side when there is an even number of lines and revealed when there is an odd number of lines. The reverse is true of the right side, allowing us to hide one side or the other as the number of lines changes.

If we make all the colors the same, the illusion is perfect!

See the Pen [Illustrating the full mask configuration](https://codepen.io/t_afif/pen/eYxBZdv) by Temani Afif.

See the Pen Illustrating the full mask configuration by Temani Afif.

We can optimize the code a little and replace the two bottom gradients with only one conical gradient, but that can lead to spacing glitches, so I won’t use it. Here is a demo to illustrate the idea, in case you are curious:

See the Pen [Illustrating the full mask configuration](https://codepen.io/t_afif/pen/mdvbpYK) by Temani Afif.

See the Pen Illustrating the full mask configuration by Temani Afif.

Putting It All Together

Here is everything we worked on in the first ribbon put together. It’s a lot of gradients, but now you know the purpose of each one.

h1 {
  --c: #d81a14;
  
  padding-inline: 1lh;
  mask:
    linear-gradient(45deg, #0000 50%, #000 0) 
      0% calc(100% - .1lh) / .8lh .8lh no-repeat,
    linear-gradient(-45deg, #0000 50%, #000 0) 
      100% calc(100% - .1lh) / .8lh .8lh no-repeat,
    linear-gradient(45deg, #000 50%, #0000 0) 
      100% .1lh / .8lh .8lh no-repeat,
    conic-gradient(from 225deg at .9lh, #0000 25%, #000 0) 
      0 1lh / 51% 2lh repeat-y,
    conic-gradient(from 45deg at calc(100% - .9lh), #0000 25%, #000 0) 
      100% 0 / 51% 2lh repeat-y;
  background:
    linear-gradient(var(--c) 80%, #0000 0) 
      0 .1lh / 100% 1lh,
    linear-gradient(90deg, color-mix(in srgb,  var(--c),#000 35%) 1.6lh, #0000 0) 
      -.8lh 50% / 100% calc(100% - .3lh) repeat-x;
}

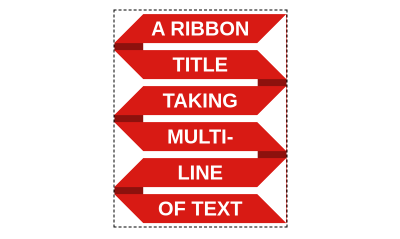
Before we move to the second ribbon, I have a challenge for you: Can you spot which values you would change to set the ribbon in the opposite shape? This will be your homework. You can always find the solution over at my ribbon collection, but give it a try using the final code above.

Reversing the ribbon’s direction

(Large preview)

Styling The Second Ribbon

The second ribbon from the demo — the green one — is a variation of the first ribbon.

Three lines of white text against a green ribbon background with angled and clipped ends.

(Large preview)

I am going a little bit faster this time around. We’re working with many of the same ideas and concepts, but you will see how relatively easy it is to create variations with this approach.

The first thing to do is to add some space on the top and bottom for the cutout part. I’m applying a transparent border for this. The thickness needs to be equal to half the height of one line (.5lh).

h1 {
  --c: #d81a14;

  border-block: .5lh solid #0000;
  padding-inline: 1lh;
  background: linear-gradient(var(--c) 80%, #0000 0) 0 .1lh / 100% 1lh padding-box;
}

A dashed black border drawn around the element’s boundaries.

(Large preview)

Note how the background gradient is set to cover only the padding area using padding-box.

Now, unlike the first ribbon, we are going to add two more gradients for the vertical pieces that create the folded darker areas.

h1 {
  --c: #d81a14;

  border-block: .5lh solid #0000;
  padding-inline: 1lh;
  background:
    /* Gradient 1 */
    linear-gradient(var(--c) 80%, #0000 0) 0 .1lh / 100% 1lh padding-box,
    /* Gradient 2 */
    linear-gradient(#0000 50%, color-mix(in srgb, var(--c), #000 35%) 0) 
     0 0 / .8lh 2lh repeat-y border-box,
    /* Gradient 3 */
    linear-gradient(color-mix(in srgb, var(--c), #000 35%) 50%, #0000 0) 
     100% 0 / .8lh 2lh repeat-y border-box;
}

Highlighting the two gradients that establish the left and right sides of the ribbon.

(Large preview)

Notice how the last two gradients are set to cover the entire area with a border-box. The height of each gradient needs to equal two lines of text (2lh), while the width should be consistent with the height of each horizontal gradient. With this, we establish the folded parts of the ribbon and also prepare the code for creating the triangular cuts at the start and end of the ribbon.

Here is an interactive demo where you can resize the container to see how the gradient responds to the number of lines of text.

See the Pen [CodePen Home
Gradient configuration of the second ribbon](https://codepen.io/t_afif/pen/JjxPEdw) by Temani Afif.

See the Pen CodePen Home
Gradient configuration of the second ribbon
by Temani Afif.

The next step is to mask the left and right sides of the ribbon using the same conical gradients that we set up for the red ribbons. We’ve already figured it out!

Highlighting the masked areas on the left and rights sides of the ribbon.

(Large preview)

Applying only the conic gradients will also hide the cutout part, so I have to introduce a third gradient to make sure they remain visible:

mask:
  /* New Gradient */
  linear-gradient(#000 1lh, #0000 0) 0 -.5lh,
  /* Left Side */
  conic-gradient(from 225deg at .9lh, #0000 25%, #000 0) 
   0 1lh / 51% 2lh repeat-y padding-box,
  /* Right Side */
  conic-gradient(from 45deg at calc(100% - .9lh), #0000 25%, #000 0) 
   100% 0 / 51% 2lh repeat-y padding-box;

And the final touch is to use clip-path for the cutouts at the ends of the ribbon.

Showing the points that make up the clipped area of the ribbon and its cuts.

(Large preview)

Notice how the clip-path is cutting two triangular portions from the bottom to make sure the cutout is always visible whether we have an odd or even number of lines.

This is how the final code looks when we put everything together:

h1 {
  --c: #d81a14;
  
  padding-inline: 1lh;
  border-block: .5lh solid #0000;
  background: 
    linear-gradient(var(--c) 80%, #0000 0)
      0 .1lh / 100% 1lh padding-box,
    linear-gradient(#0000 50%, color-mix(in srgb,var(--c), #000 35%) 0)
      0 0 / .8lh 2lh repeat-y border-box,
    linear-gradient(color-mix(in srgb, var(--c), #000 35%) 50%, #0000 0)
      100% 0 / .8lh 2lh repeat-y border-box;
  mask:
    linear-gradient(#000 1lh, #0000 0) 0 -.5lh,
    conic-gradient(from 225deg at .9lh,#0000 25%,#000 0)
     0 1lh/51% 2lh repeat-y padding-box,
    conic-gradient(from 45deg at calc(100% - .9lh), #0000 25%, #000 0)
     100% 0 / 51% 2lh repeat-y padding-box;
  clip-path: polygon(0 0, calc(100% - .8lh) 0,
    calc(100% - .4lh) .3lh,
    100% 0, 100% 100%,
    calc(100% - .4lh) calc(100% - .3lh),
    calc(100% - .8lh) 100%, .8lh 100%, .4lh calc(100% - .3lh), 0 100%);
}

I challenged you to find a way to reverse the direction of the first ribbon by adjusting the gradient values. Try to do the same thing here!

Reversing the direction of the ribbon.

(Large preview)

It may sound difficult. If you need a lifeline, you can get the code from my online collection, but it’s the perfect exercise to understand what we are doing. Explaining things is good, but nothing beats practicing.

The Final Demo

Here is the demo once again to see how everything comes together.

See the Pen [Responsive multi-line ribbon shapes](https://codepen.io/t_afif/pen/NWeYwBK) by Temani Afif.

See the Pen Responsive multi-line ribbon shapes by Temani Afif.

Wrapping Up

There we go, two more ribbons that build off of the ones we created together in the first article of this brief two-part series. If there’s only one thing you take away from these articles, I hope it’s that modern CSS provides us with powerful tools that offer different, more robust approaches to things we used to do a long time ago. Ribbons are an excellent example of a long-living design pattern that’s been around long enough to demonstrate how creating them has evolved over time as new CSS features are released.

I can tell you that the two ribbons we created in this article are perhaps the most difficult shapes in my collection of ribbon shapes. But if you can wrap your head around the use of gradients — not only for backgrounds but masks and clipping paths as well — you’ll find that you can create every other ribbon in the collection without looking at my code. It’s getting over that initial hurdle that makes this sort of thing challenging.

You now have the tools to make your own ribbon patterns, too, so why not give it a try? If you do, please share them in the comments so I can see your work!

Further Reading On SmashingMag

Smashing Editorial
(gg, yk)

CSS Responsive Multi-Line Ribbon Shapes (Part 1)

CSS Responsive Multi-Line Ribbon Shapes (Part 1)

CSS Responsive Multi-Line Ribbon Shapes (Part 1)

Temani Afif

2023-11-15T10:00:00+00:00
2023-11-21T22:05:36+00:00

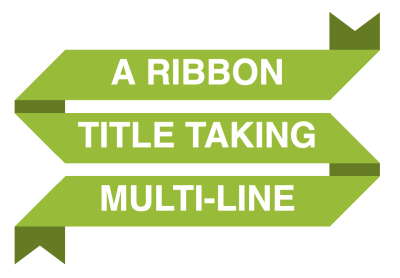
Back in the early 2010s, it was nearly impossible to avoid ribbon shapes in web designs. It was actually back in 2010 that Chris Coyier shared a CSS snippet that I am sure has been used thousands of times over.

And for good reason: ribbons are fun and interesting to look at. They’re often used for headings, but that’s not all, of course. You’ll find corner ribbons on product cards (“Sale!”), badges with trimmed ribbon ends (“First Place!”), or even ribbons as icons for bookmarks. Ribbons are playful, wrapping around elements, adding depth and visual anchors to catch the eye’s attention.

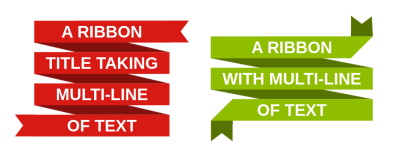
I have created a collection of more than 100 ribbon shapes, and we are going to study a few of them in this little two-part series. The challenge is to rely on a single element to create different kinds of ribbon shapes. What we really want is to create a shape that accommodates as many lines of text as you throw at them. In other words, there is no fixed dimension or magic numbers — the shape should adapt to its content.

Here is a demo of what we are building in this first part:

See the Pen [Responsive multi-line ribbon shapes](https://codepen.io/smashingmag/pen/LYMjNoo) by Temani Afif.

See the Pen Responsive multi-line ribbon shapes by Temani Afif.

You can play with the text, adjust the screen size, change the font properties, and the shape will always fit the content perfectly. Cool, right? Don’t look at the code just yet because we will build this together from scratch.

How Does It Work?

We are going to rely on a single HTML element, an <h1> in this case, though you can use any element you’d like as long as it can contain text.

<h1>Your text goes here</h1>

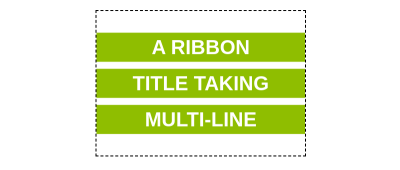
Now, if you look closely at the ribbon shapes, you can notice a general layout that is the same for both designs. There’s really one piece that repeats over and over.

Ribbon shape with a selected one piece which repeats through the whole shape

(Large preview)

Sure, this is not the exact ribbon shape we want, but all we are missing is the cutouts on the ends. The idea is to first start with this generic design and add the extra decoration as we go.

Both ribbons in the demo we looked at are built using pretty much the same exact CSS; the only differences are nuances that help differentiate them, like color and decoration. That’s my secret sauce! Most of the ribbons from my generator share a common code structure, and I merely adjust a few values to get different variations.

Let’s Start With The Gradients

Any time I hear that a component’s design needs to be repeated, I instantly think of background gradients. They are perfect for creating repeatable patterns, and they are capable of drawing lines with hard stops between colors.

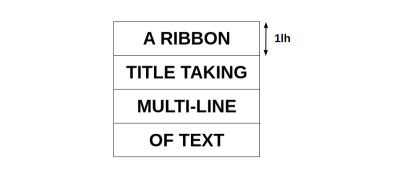
We’re essentially talking about applying a background behind a text element. Each line of text gets the background and repeats for as many lines of text as there happens to be. So, the gradient needs to be as tall as one line of text. If you didn’t know it, we recently got the new line height (lh) unit in CSS that allows us to get the computed value of the element’s line-height. In our case, 1lh will always be equal to the height of one line of text, which is perfect for what we need.

Lines of text with a measurement next to a line height, which equals to 1lh

(Large preview)

Note: It appears that Safari uses the computed line height of a parent element rather than basing the lh unit on the element itself. I’ve accounted for that in the code by explicitly setting a line-height on the body element, which is the parent in our specific case. But hopefully, that will be unnecessary at some point in the future.

Let’s tackle our first gradient. It’s a rectangular shape behind the text that covers part of the line and leaves breathing space between the lines.

A rectangular shape gradient in red color marked with 70% and 30% of transparent color between lines

(Large preview)

The gradient’s red color is set to 70% of the height, which leaves 30% of transparent color to account for the space between lines.

h1 {
  --c: #d81a14;
  
  background-image: linear-gradient(var(--c) 70%, #0000 0);
  background-position: 0 .15lh;
  background-size: 100% 1lh;
}

Nothing too complex, right? We’ve established a background gradient on an h1 element. The color is controlled with a CSS variable (--c), and we’ve sized it with the lh unit to align it with the text content.

Note that the offset (.15lh) is equal to half the space between lines. We could have used a gradient with three color values (e.g., transparent, #d81a14, and transparent), but it’s more efficient and readable to keep things to two colors and then apply an offset.

Next, we need a second gradient for the wrapped or slanted part of the ribbon. This gradient is positioned behind the first one. The following figure demonstrates this with a little opacity added to the front ribbon’s color to see the relationship better.

Two line of text with a gradient for the wrapped part of the ribbon positioned behind the first gradient

(Large preview)

Here’s how I approached it:

linear-gradient(to bottom right, #0000 50%, red 0 X, #0000 0);

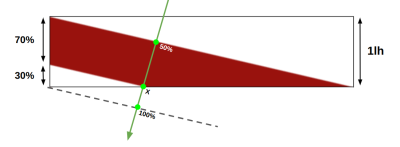
This time, we’re using keywords to set the gradient’s direction (to bottom right). Meanwhile, the color starts at the diagonal (50%) instead of its default 0% and should stop at a value that we’re indicating as X for a placeholder. This value is a bit tricky, so let’s get a visual that illustrates what we’re doing.

A gradient for the wrapped part of the ribbon with the green arrow that illustrates the gradient direction with different color stops

(Large preview)

The green arrow illustrates the gradient direction, and we can see the different color stops: 50%, X, and 100%. We can apply some geometry rules to solve for X:

(X - 50%) / (100% - 50%) = 70%/100%
X = 85%

This gives us the exact point for the end of the gradient’s hard color stop. We can apply the 85% value to our gradient configuration in CSS:

h1 {
  --c: #d81a14;
  
  background-image: 
    linear-gradient(var(--c) 70%, #0000 0), 
    linear-gradient(to bottom left, #0000 50%, color-mix(in srgb, var(--c), #000 40%) 0 85%, #0000 0);
  background-position: 0 .15lh;
  background-size: 100% 1lh;
}

You’re probably noticing that I added the new color-mix() function to the second gradient. Why introduce it now? Because we can use it to mix the main color (#d81a14) with white or black. This allows us to get darker or lighter values of the color without having to introduce more color values and variables to the mix. It helps keep things efficient!

See the Pen [The gradient configuration](https://codepen.io/smashingmag/pen/eYbwwyo) by Temani Afif.

See the Pen The gradient configuration by Temani Afif.

We have accomplished the main piece of the design! We can turn our attention to creating the ribbon shape. You will notice some unwanted repetition at the top and the bottom. Don’t worry about it; it will be fixed in the next section.

Next, Let’s Make The Ribbons

Before we move in, let’s take a moment to remember that we’re making two ribbons. The demo at the beginning of this article provides two examples: a red one and a green one. They’re similar in structure but differ in the visual details.

For the first one, we’re taking the start and end of the ribbon and basically clipping a triangle out of it. We’ll do a similar thing with the second ribbon example with an extra fold step for the cutout part.

The First Ribbon

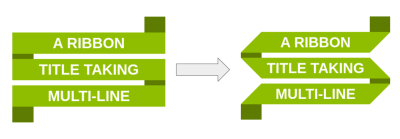
The only thing we need to do for the first ribbon is apply a clip-path to cut the triangular shape out from the ribbon’s ends while trimming unwanted artifacts from the repeating gradient at the top and bottom of the ribbon.

Two variants of the first ribbon before and after applied clip-path

(Large preview)

We have all of the coordinates we need to make our cuts using the polygon() function on the clip-path property. Coordinates are not always intuitive, but I have expanded the code and added a few comments below to help you identify some of the points from the figure.

h1 {
  --r: 10px; /* control the cutout */

  clip-path: polygon(
   0 .15lh, /* top-left corner */
   100% .15lh, /* top right corner */
   calc(100% - var(--r)) .5lh, /* top-right cutout */
   100% .85lh,
   100% calc(100% - .15lh), /* bottom-right corner  */
   0 calc(100% - .15lh), /* bottom-left corner */
   var(--r) calc(100% - .5lh), /* bottom-left cutout */
   0 calc(100% - .85lh)
  );
}

This completes the first ribbon! Now, we can wrap things up (pun intended) with the second ribbon.

The Second Ribbon

We will use both pseudo-elements to complete the shape. The idea can be broken down like this:

  1. We create two rectangles that are placed at the start and end of the ribbon.
  2. We rotate the two rectangles with an angle that we define using a new variable, --a.
  3. We apply a clip-path to create the triangle cutout and trim where the green gradient overflows the top and bottom of the shape.

The second ribbon in three pictures: with two rectangles created, two rectangles rotated, and applied clip-path

(Large preview)

First, the variables:

h1 {
  --r: 10px;  /* controls the cutout */
  --a: 20deg; /* controls the rotation */
  --s: 6em;   /* controls the size */
}

Next, we’ll apply styles to the :before and :after pseudo-elements that they share in common:

h1:before,
h1:after {
  content: "";
  position: absolute;
  height: .7lh;
  width: var(--s);
  background: color-mix(in srgb, var(--c), #000 40%);
  rotate: var(--a);
}

Then, we position each pseudo-element and make our clips:

h1:before {
  top: .15lh;
  right: 0;
  transform-origin: top right;
  clip-path: polygon(0 0, 100% 0, calc(100% - .7lh / tan(var(--a))) 100%, 0 100%, var(--r) 50%);
}

h1:after {
  bottom: .15lh;
  left: 0;
  transform-origin: bottom left;
  clip-path: polygon(calc(.7lh / tan(var(--a))) 0, 100% 0, calc(100% - var(--r)) 50%, 100% 100%, 0 100%);
}

We are almost done! We still have some unwanted overflow where the repeating gradient bleeds out of the top and bottom of the shape. Plus, we need small cutouts to match the pseudo-element’s shape.

The second ribbon before and after clip-path

(Large preview)

It’s clip-path again to the rescue, this time on the main element:

clip-path: polygon(
    0 .15lh,
    calc(100% - .7lh/sin(var(--a))) .15lh,
    calc(100% - .7lh/sin(var(--a)) - 999px) calc(.15lh - 999px*tan(var(--a))),
    100% -999px,
    100% .15lh,
    calc(100% - .7lh*tan(var(--a)/2)) .85lh,
    100% 1lh,
    100% calc(100% - .15lh),
    calc(.7lh/sin(var(--a))) calc(100% - .15lh),
    calc(.7lh/sin(var(--a)) + 999px) calc(100% - .15lh + 999px*tan(var(--a))),
    0 999px,
    0 calc(100% - .15lh),
    calc(.7lh*tan(var(--a)/2)) calc(100% - .85lh),
    0 calc(100% - 1lh)
);

Ugh, looks scary! I’m taking advantage of a new set of trigonometric functions that help a bunch with the calculations but probably look foreign and confusing if you’re seeing them for the first time. There is a mathematical explanation behind each value in the snippet that I’d love to explain, but it’s long-winded. That said, I’m more than happy to explain them in greater detail if you drop me a line in the comments.

Our second ribbon is completed! Here is the full demo again with both variations.

See the Pen [CodePen Home
Responsive multi-line ribbon shapes](https://codepen.io/smashingmag/pen/LYMjNoo) by Temani Afif.

See the Pen CodePen Home
Responsive multi-line ribbon shapes
by Temani Afif.

Wrapping Up

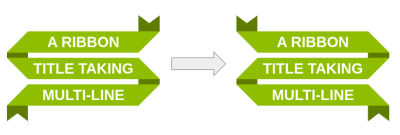
We looked at two ribbon variations that use almost the same code structure, but we can make many, many more the same way. Your homework, if you accept it, will be to make the following variations using what you have learned so far.

Final versions of two ribbon variations

(Large preview)

You can still find the code within my ribbons collection, but it’s a good exercise to try writing code without. Maybe you will find a different implementation than mine and want to share it with me in the comments! In the next article of this two-part series, we will increase the complexity and produce two more interesting ribbon shapes.

Further Reading On SmashingMag

Smashing Editorial
(gg, yk)

50+ Useful WordPress Keyboard Shortcuts for Windows and Mac

Understanding computer keyboard shortcuts can drastically elevate your productivity. In a similar vein, if you’re acquainted with specific WordPress keyboard shortcuts, your workflow can become notably smoother. This is particularly beneficial for individuals who prefer not to toggle between the keyboard and mouse. Hence, for such users, these shortcuts can be invaluable.

WordPress offers an abundance of shortcuts for tasks like editing content, performing specific actions, or even simple navigation. In this article, we’ll delve into a detailed list of nearly all the WordPress keyboard shortcuts to enhance your efficiency.

Basic Navigation

Navigation in WordPress is akin to browsing through any other website. The essential keys you need for this are Tab, Arrow, Enter, and Backspace. Below, we elaborate on each of these keys and their functions.

Tab

By pressing the Tab key, you can move to the subsequent clickable link or option on the page, starting from the top. By pressing it successively, you can navigate from one option to another. If you need to navigate backward, simply hold Shift and press Tab.

Arrow Keys

Utilizing the arrow keys – , , , and – will enable you to scroll through the content of the post.

Enter/Return

To confirm a dialog box or access a specific option, all you need to do is press the Enter key.

Backspace

The Backspace key lets you navigate back to the preceding page. For forward navigation, hold the Shift key and press Backspace.

Post Editing

Here’s where the excitement truly kicks in. Mastering the post editor shortcuts can significantly streamline the process of editing and formatting your content. Below is a comprehensive list of shortcuts for content management, editing, and formatting – all the tools you’ll require to craft content on WordPress efficiently.

Content Management
ActionWindows ShortcutMac Shortcut
Highlight content per characterShift + / Shift + /
Highlight content per wordCtrl + Shift + / Option + Shift + /
Highlight above/below lineShift + / Shift + /
Select all contentCtrl + ACmd + A
Paste content without formattingCtrl + Shift + VCmd + Shift + V
Content Formatting
ActionWindowsMac
Strikethrough textShift + Alt + DShift + Option + D
Insert linkCtrl + KCommand + K
Remove linkShift + Alt + SShift + Option + S
Apply heading 1Shift + Alt + 1Shift + Option + 1
Apply heading 2Shift + Alt + 2Shift + Option + 2
Apply heading 3Shift + Alt + 3Shift + Option + 3
Apply heading 4Shift + Alt + 4Shift + Option + 4
Apply heading 5Shift + Alt + 5Shift + Option + 5
Apply heading 6Shift + Alt + 6Shift + Option + 6
Apply paragraph formattingShift + Alt + 7Shift + Option + 7
Start bullet listShift + Alt + UShift + Option + U
Start numbered listShift + Alt + OShift + Option + O
BlockquoteShift + Alt + QShift + Option + Q
Apply code formattingShift + Alt + XShift + Option + X
Apply Address formattingShift + Alt + 9Shift + Option + 9
Align centerShift + Alt + CShift + Option + C
Align rightShift + Alt + RShift + Option + R
Align leftShift + Alt + LShift + Option + L
JustifyShift + Alt + JShift + Option + J
Add mediaShift + Alt + MShift + Option + M
Toggle toolbarShift + Alt + ZShift + Option + Z
Insert Page Break tagShift + Alt + PShift + Option + P
Insert Read More tagShift + Alt + TShift + Option + T
Enable/disable Distraction free modeShift + Alt + WShift + Option + W
Open helpShift + Alt + HShift + Option + H

Comments

WordPress provides specialized shortcuts for the comment moderation section to facilitate easier comment management. However, it’s imperative to first enable these keyboard shortcuts for comment moderation prior to utilizing them. Let’s walk through the process:

Begin by navigating to your WordPress user profile. Once there, select the option titled “Enable keyboard shortcuts for comment moderation”. Activating this option will make all the shortcuts mentioned below functional. It’s essential to note that each user must individually enable these shortcuts for them to work.

Enabling keyboard shortcuts for comment moderation in WordPress
Comment Navigation

The keys J and K are all you’ll require to seamlessly navigate through comments.

By pressing J, you can scroll downwards through the comments. If none are highlighted, it will select the topmost comment. Conversely, K allows you to move upwards.

Moreover, upon reaching the last comment, pressing J will take you to the next page of comments, whereas K brings you back to the previous page.

Comment Actions

The following shortcuts, which only require a single key press, become operational when a comment or multiple comments are highlighted:

ActionWindows and Mac
Approve commentA
Mark as spamS
Move to trashD
Undo recent actionZ
Unapprove commentU
Reply to commentR
Enable quick editQ
Open comment editing screenE
Apply Actions in Bulk

WordPress comes with a set of shortcuts designed specifically for executing bulk actions in the comments section. The following table provides a comprehensive list of these shortcuts:

ActionWindows and Mac Shortcut
Select all commentsShift + X
Approve all selected commentsShift + A
Trash selected commentsShift + T
Permanently delete selected commentsShift + D
Mark selected comments as spamShift + S
Unapprove selected commentsShift + U
Restore select commentsShift + Z

Ending Thoughts

Utilizing these keyboard shortcuts can significantly enhance your productivity when managing your WordPress website. Personally, I seldom resort to using the mouse during the editing process, and, despite a brief lag in highlighting content, I’ve encountered no issues.

If you’re acquainted with other handy WordPress keyboard shortcuts or WordPress tips and tricks, we’d love to hear from you in the comments.

Read Also: 
How to Add Keyboard Shortcuts to Your Website

The post 50+ Useful WordPress Keyboard Shortcuts for Windows and Mac appeared first on Hongkiat.